Quick start
Some experience with Docker will be helpful. If new, we recommend covering the follwing from the official Docker site:
For more visual learners, you can view one of our live how-to recordings here (covers the required docker concepts)
Preparing your algorithm
You will need a folder containing your code, a Dockerfile, a requirements.txt file, and a .dockerignore file
-
Algorithm code (this example uses python)
-
Code inside the
TODOblocks should be replaced with your algorithm logic -
If your algorithm requires additional user-specified arguments, you can add them in the same format as shown in the code snippet below.
These additional arguments should be specified on the CODIDO algorithm edit page.
Optional flags should be treated as regular flags with a value; ie --flag True or --flag False.
-
If you are getting any file related errors, make sure to ONLY USE
input_file_path(orinput_folder_path) andoutput_file_pathin the code you write. -
Results will be available to download from a user's dashboard.
import argparse
import zipfile
import os
import glob

parser = argparse.ArgumentParser()
parser.add_argument("--input", help="input")
parser.add_argument("--output", help="output")
parser.add_argument("--codido", help="running on codido")
############################################
# TODO: add extra args here
############################################

args = parser.parse_args()

input_folder_path = os.path.join(os.sep, 'app', 'inputs')
output_folder_path = os.path.join(os.sep, 'app', 'outputs')
os.makedirs(input_folder_path, exist_ok=True)
os.makedirs(output_folder_path, exist_ok=True)

if args.codido == 'True':
    import boto3
    s3 = boto3.client('s3')

    # downloads codido input file into the folder specified by input_folder_path
    input_file_path = os.path.join(input_folder_path, args.input.split('_SPLIT_')[-1])
    s3.download_file(os.environ['S3_BUCKET'], args.input, input_file_path)
else:
    input_file_path = glob.glob(os.path.join(input_folder_path, '*'))[0]

############################################
# TODO: the input is now accessible via input_file_path
############################################

############################################
# TODO: outputs should be saved to output_folder_path like follows:
with open(os.path.join(output_folder_path, 'TODO.txt'), 'w') as f:
    f.write('Hello World')
############################################

if args.codido == 'True':
    # create zip with all the saved outputs
    zip_name = output_folder_path + '.zip'
    with zipfile.ZipFile(zip_name, 'w', zipfile.ZIP_DEFLATED) as zip_ref:
        for folder_name, subfolders, filenames in os.walk(output_folder_path):
            for filename in filenames:
                file_path = os.path.join(folder_name, filename)
                zip_ref.write(file_path, arcname=os.path.relpath(file_path, output_folder_path))

    # upload
    s3.upload_file(zip_name, os.environ['S3_BUCKET'], args.output)
Allow your algorithm to take in multiple files by accepting a zip file and then unzipping the files within the algorithm
import argparse
import zipfile
import os
import glob
import zipfile

parser = argparse.ArgumentParser()
parser.add_argument("--input", help="input")
parser.add_argument("--output", help="output")
parser.add_argument("--codido", help="running on codido")
############################################
# TODO: add extra args here
############################################

input_folder_path = os.path.join(os.sep, 'app', 'inputs')
output_folder_path = os.path.join(os.sep, 'app', 'outputs')
os.makedirs(input_folder_path, exist_ok=True)
os.makedirs(output_folder_path, exist_ok=True)

if args.codido == 'True':
    import boto3
    s3 = boto3.client('s3')

    # downloads codido input file into the folder specified by input_folder_path
    input_file_path = os.path.join(input_folder_path, args.input.split('_SPLIT_')[-1])
    s3.download_file(os.environ['S3_BUCKET'], args.input, input_file_path)
else:
    input_file_path = glob.glob(os.path.join(input_folder_path, '*'))[0]

with zipfile.ZipFile(input_file_path, 'r') as zip_ref:
    zip_ref.extractall(input_folder_path)
os.remove(input_file_path) # remove the zip file

############################################
# TODO: the unzipped input files are now accessible via input_folder_path
############################################

############################################
# TODO: outputs should be saved to output_folder_path like follows:
with open(os.path.join(output_folder_path, 'TODO.txt'), 'w') as f:
    f.write('Hello World')
############################################

if args.codido == 'True':
    # create zip with all the saved outputs
    zip_name = output_folder_path + '.zip'
    with zipfile.ZipFile(zip_name, 'w', zipfile.ZIP_DEFLATED) as zip_ref:
        for folder_name, subfolders, filenames in os.walk(output_folder_path):
            for filename in filenames:
                file_path = os.path.join(folder_name, filename)
                zip_ref.write(file_path, arcname=os.path.relpath(file_path, output_folder_path))

    # upload
    s3.upload_file(zip_name, os.environ['S3_BUCKET'], args.output)
import argparse import zipfile import os import glob parser = argparse.ArgumentParser() parser.add_argument("--output", help="output") parser.add_argument("--codido", help="running on codido") ############################################ # TODO: add extra args here ############################################ args = parser.parse_args() output_folder_path = os.path.join(os.sep, 'app', 'outputs') os.makedirs(output_folder_path, exist_ok=True) ############################################ # TODO: do stuff ############################################ ############################################ # TODO: outputs should be saved to output_folder_path like follows: with open(os.path.join(output_folder_path, 'TODO.txt'), 'w') as f: f.write('Hello World') ############################################ if args.codido == 'True': # create zip with all the saved outputs zip_name = output_folder_path + '.zip' with zipfile.ZipFile(zip_name, 'w', zipfile.ZIP_DEFLATED) as zip_ref: for folder_name, subfolders, filenames in os.walk(output_folder_path): for filename in filenames: file_path = os.path.join(folder_name, filename) zip_ref.write(file_path, arcname=os.path.relpath(file_path, output_folder_path)) # upload import boto3 s3 = boto3.client('s3') s3.upload_file(zip_name, os.environ['S3_BUCKET'], args.output) -
-
Dockerfile
First test locally by building the Docker image for your machine (
docker build -t <NAME>
                        .
) and then running it with the command below.-
The Dockerfile below assumes an entry-script called
app.py
-
Deep learning libraries such as Tensorflow and Pytorch have existing base docker images (view more here). The GPU versions will set up CUDA and CUDNN for you (it will still use the CPU version if your local machine does not have a GPU).
-
In your project directory, create a folder called inputs/ containing your algorithm input (if applicable) and outputs/ which will hold the outputs from your algorithm.
-
In the Dockerfile below, all the files in your project directory will be copied to the /app/ folder in the Docker container.
-
The input will be available at /app/inputs/ and the output will be saved to /app/outputs/
However!! we need a way to share the outputs in the Docker container (/app/outputs/) with our local machine (/my/project/directory/outputs/).
-
We recommend to use volumes to perform this sharing and the command is as follows:
docker run -v '/my/project/directory/outputs:/app/outputs' <NAME>
# choose an appropriate base image for your algorithm. FROM python:latest # docker files start running from the point that got changed. since our code files will tend to change alot, # we don't want things like pulling the base docker image and downloading the requirements.txt file to happen everytime. # hence we keep these things at the top COPY requirements.txt . RUN pip3 install -r requirements.txt WORKDIR /app COPY . . ENTRYPOINT ["python", "app.py"] CMD ["--codido", "False"] # TODO: or if you have additional args: CMD ["--codido", "False", "--arg1", "val1", "--arg2", "val2", etc]-
Once it runs without issue and is ready for CODIDO, then you need to build for x86/amd_64 (if not already). You can modify the
FROMstatement in your dockerfile toFROM --platform=linux/amd64 ...to achieve this -
The
CMDcommand in your dockerfile will automatically be overwritten when run through CODIDO so that can be left as is. -
Ensure that you have a .dockerignore file that lists
inputs/,outputs/, andvenv/or any virual environments in the working directory (if applicable). This point is emphasized again in step 4 below.
-
The
requirements.txtfile must haveboto3in order to interact with the cloud persistance storage we use. -
Use a
.dockerignorefile to make sure no unnecessary files (such as virual environments, inputs, outputs, etc) are being copied from the working directory into the docker container, since in the above dockerfile, we are copying everything withCOPY . .
Creating & customizing a repository
First, create a new repository from your dashboard.
Note that these random token repository names should not be shared with others as anyone with this token can push a Docker image to your repo.In the edit page, you should give your algorithm repository an image, name, and description so that people can know what your algorithm is all about
Notable fields:
-
Algorithms set to public with at least 1 Docker image will be publicly viewable and runnable from the marketplace
-
You can require a GPU if needed and adjust memory requirements. Note that:
Algorithms that don't use GPU still use a compute optimized CPU
Using more resources than needed can result in higher costs and longer waits before the algorithm starts and completes
- Extra command line arguments required for your algorithm can be set. These arguments will be required to be filled out by a user when they try to run your algorithm.
Pushing to a repository
-
Now that you have confirmed your Dockerized algorithms works locally and then built it for CODIDO, it is now time to push your algorithm to CODIDO
Assuming the name of your build Docker image is called
<NAME>, we run the following command:docker tag <NAME> 230863325152.dkr.ecr.us-east-1.amazonaws.com/<repo>:latestwhere
<repo>can be found in your dashboard -
Before being able to publish, in your dashboard you will need to first generate a new auth token (
$CODIDO_TOKEN) and then login to docker with it (lasts 12 hours)docker login --username AWS --password $CODIDO_TOKEN 230863325152.dkr.ecr.us-east-1.amazonaws.com -
You can then publish using
docker push 230863325152.dkr.ecr.us-east-1.amazonaws.com/<repo>:latest - When ready to update your algorithm on CODIDO, re-build your Docker image and push. Only the latest version will be kept and used on CODIDO.
FAQ
This error arises when the Docker image was built for a different computer architecture than your computer.
Not all Docker images have support for your computer architecture. For example, the M1 Mac's use an ARM architecture, however, the Tensorflow docker images only have support for x86/amd_64 as shown here:
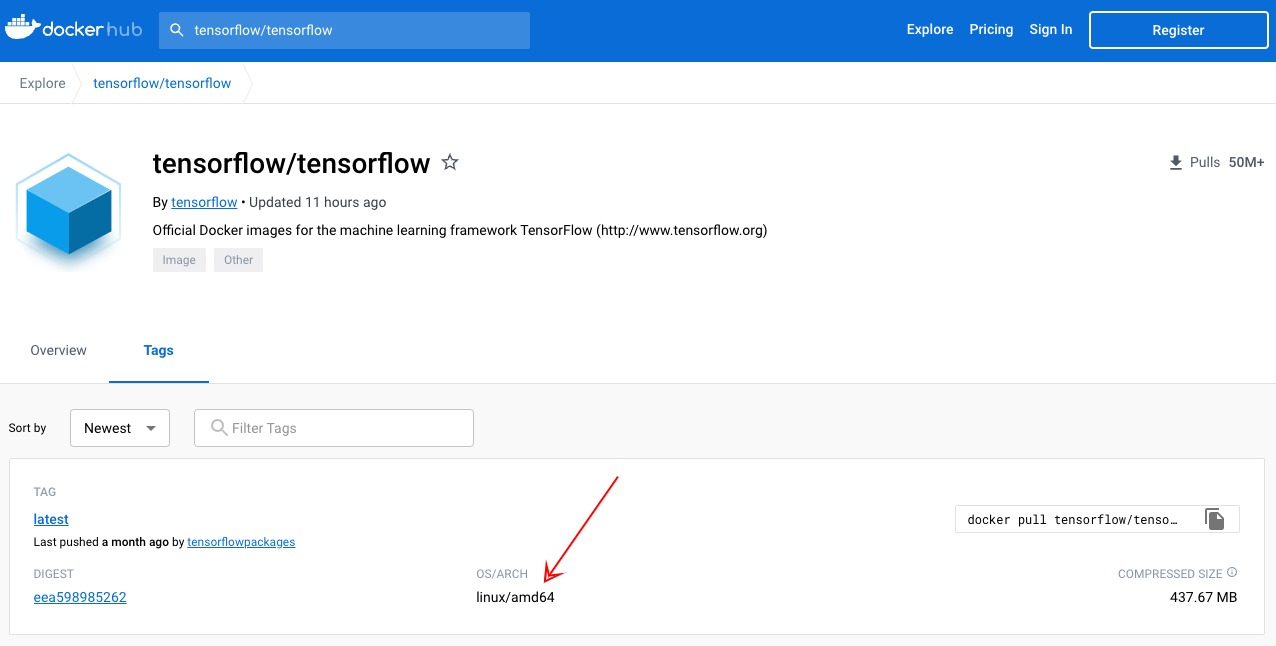
When you build your Docker image for the M1 Mac, it will automatically build for x86/amd_64 (as that's the only thing available) which will then fail when you run locally. If you have an older Mac or a linux/windows machine, then those will generally all use the x86/amd_64 architecture.
For docker images that have support for ARM and x86/amd_64, it would build for ARM which you can then
run
locally, but make sure
to rebuild for x86/amd_64 with the flag --platform=linux/amd64 before pushing to CODIDO
as
that is what our servers use.
Docker is not running with GPU when running locally
Make sure to run with the --gpus all
If you get an error that looks like this:
docker: Error response from daemon: could not select device driver "" with capabilities:
                        [[gpu]].
, then if you are using a NVIDIA GPU we need to install the Nvidia Container
Toolkit in order to add
NVIDIA gpu support to Docker.
docker run —gpu all <NAME> should work now
How long can my jobs run? Is there a limit?
Make sure your algorithm does not exceed 60 minutes or it will be terminated
If AFTER all possible optimizations are performed and your algorithm still requires long run times, please provide information in your app description in regards to what the user should expect and what the recommended input sizes are
My algorithm takes longer to run on CODIDO than my local computer. Why?
It may take some time to find an available machine with your desired settings (GPU, memory requirements, etc). CPU-based lightweight algorithms should be relatively quick to run.
CODIDO should not be your platform for testing! Make sure to resolve all issues locally.
What is the warning icon that I see on my algorithm? And what are "Failed Runs Logs"?
The warning icon will appear when your algorithm has been run by another user(s) and it has ended up as a failure for 1 or more times. You will have the ability to look into why by viewing the accompanying logs in the "Failed Run Logs" table. This table also provides some other data that may be useful for debugging, including the arguments the user specified, how long the algorithm took to run (keep in mind the timeout!), as well as the date. You may contact the user at their specified email for additional info or when you have resolved the issue.
When all failed logs have been deleted from the table, the warning icon will no longer been shown (until the next time a failure occurs)